
What is a shower kit, to begin with?
Shower faucets, showerheads, and bath enclosures make a shower kit. Basically, a shower kit is a system consisting of all fixtures you need to make a complete bathing area.
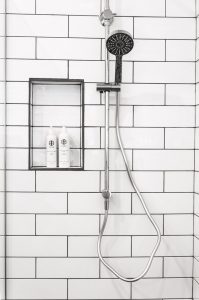
The showerhead pours down a shower of water when you turn on the controls.
The shower faucet is made up of two parts:
- the showerhead and all the
- shower controls that serve to regulate the temperature and flow of water.
Shower faucets and bathtubs are 3-piece systems that entail a bath faucet, valve, and showerhead.
Shower kits may include a few luxurious elements like wall jets, steam shower, or handheld showerhead.
Shower supplies stores don’t sell shower kits as complete units. Rather, they avail many styles of different components and let you choose the right combination that meets your needs.
Components of a Typical Shower Kit
1. Showerheads
Showerheads may be fixed up there on the shower kit and forgotten, but they are all not the same.
When shopping for a showerhead for your mobile home’s bathroom, your choices will be limited to just three types of showerheads:
- Fixed
- Handled
- 2-in-1
Fixed Shower Heads
These showerheads are fixed permanently to the wall of our shower unit.
Some of them can be installed in such a way that the height is adjustable to accommodate users of different heights.
Spray or rainfall showerheads are almost always mounted from the unit’s ceiling to mimic true rain showers, but specialized plumbing will be needed.
Handled Showerheads
These showerheads border between the luxury side and low-end shower head options. Instead of hanging over your head, they are connected to the feeder hose which is connected to the wall.
You can hold them in your hands and deliver jets of water on any part of your body. If you are looking for a showerhead ideal for washing pets and children, this type of shower head should appear among your list of options.
2-in-1 Showerheads
If you can’t settle on a handheld showerhead or fixed option, consider the 2-in-1 unit which comes with a handheld shower that can be easily fixed on your conventional shower head.
Delta produces some of the industry’s best 2-in-1 shower heads, including the In2ition Two-in-One 5-Spray 6.8 in. Dual Wall Mount Fixed and Handheld Shower Head.
You can make up 6 settings with this shower: full body, full spray with massage, fast massage, pause, and slow massage.
2. Enclosures
Enclosures, whether made from glass or plastic, create confinements around the showerhead to prevent splashes of water from messing the rest of the floor in your bathroom.
3. Faucets
The job of shower faucets is to control the flow and temperature of the water. They are accompanied by three types of control handles – knobs, cross, and levers.
Because of the risk of a shower of superhot water suddenly falling on your head with a simple adjustment on the handle, most faucets nowadays come with scald guards and pressure balancers.
If a bathtub is included on your shower system, you will need a faucet equipped with a diverter so that you can conveniently control both your tub and shower from one place
6 Things to Look for In a Shower Kit
1. Type of faucets
Faucets are some of the most important parts of the shower kit because they regulate the intensity of shower and can prevent scalding if your kit is linked to a hot water system.
2. Materials and finishes
A big part of the shower heads you will find in the store are made of solid brass, metal, plastic with colored or chrome finish.
Both handheld and fixed shower heads come with different finishes on them – some of them are luxurious while others are plain simple enough not to give you a run for your money.
Some of the commonly used finishes and colors used are:
- Polished or brushed chrome
- Oil-rubbed bronze
- Polished or brushed nickel
- Copper
- White
- Off-white
- Antique or polished brass
3. Energy efficiency and water conservation
Energy efficiency is one of the factors you wouldn’t compromise on.
Because you want a warm shower in the mornings, you would only choose showerheads that won’t bloat your energy bills.
Also, you would like a shower head that is conservative with water – torrents of showers are wasteful.
It is recommended that you look for the WaterSense® label on every shower head you wish to buy.
Showers heads with this label are low-flow varieties – they have been tested and found to save water compared to standard models.
According to the U.S. government’s standards and regulations, the water flow rate cannot be more than 2.5 gallons/minute at the standardized pressure of 80 lbs./square inch (PSI).
A shower head with a genuine WaterSense® label prevents water wastage, meaning you will end up paying less money on water bills than if you would’ve opted for an option without the label.
However, it is important to note that not all homes across the United States are supplied with water with pressure as high as standard 80 PSI.
Pressure levels lower than this can create a dramatic difference when it comes to the effectiveness of your shower.
If it has ever felt to you that you can’t properly rinse the shampoo from your hair at your level of pressure, it would be prudent for you to look for a showerhead option designed specifically for your home’s water pressure.
Some showerheads come with a valve that supports cut-off functionality, meaning you can stop the flow of water while bathing. It may look trivial but can save you a lot of money in the long run.
4. Spray patterns
Consider choosing a shower head in which the water spray pattern can be easily adjusted.
Most of the shower heads you will find in the store supports one of these three spray patterns:
- A targeted pattern that produces sharp sprays good for your sore muscles
- A drenching spray that produces a moderate spray good for rinsing shampoo and foam from your hair
- A wide coverage spray capable of producing the feel of a drenching rain – this spray pattern is good for everyday use.
5. ADA Compliance
Long after the landmark 1964 Civil Rights Act, the U.S. Department of Justice came up with ADA (Americans with Disabilities Act) standards for accessible design.
These standards require businesses to design their products and platforms in such a way that they can be easily accessed and used by people with different disabilities.
Standard shower kits can be really difficult to use for, say, a visually impaired or paraplegic person.
If you have a disabled family member, you would want to select a shower kit that supports the needs of their needs.
Fortunately, all ADA compliant products have ADA Compliance label on them, meaning you will have an easy time choosing one.
6. Luxury Features
Luxury features are add-ons that you would have still had a nice without but have been included there to improve your experience.
They are part of the shower kits although some of them can be installed later after you have set up the unit.
Steam showers are perhaps the most renowned luxury feature often added to modern shower units.
They come with a generator that converts water into steam before piping it into your shower enclosure.
Some showers come with a music system to keep you entertained as you make a splash.
How To Buy A Shower Kit In 6 Easy Steps
Step One – Measure Up
The first thing you should do is to take the measurements of your current shower kit (if you are doing a replacement) or measure the area you intend to install the kit.
The most important part of this step is taking the measurements of the drain configuration.
The drain is often centrally located in new shower units.
Most shower kits today are sold in standard sizes of 36” x 36” and 42” x 42”.
Tip: If you are replacing your old fixture, your new shower’s configuration should match the current plumbing. If it is new construction, you’ll have the flexibility to make changes and arrange the plumbing to perfectly match your configuration of choice.
Measure the size of the space where the new shower kit will be installed.
Measure the height in 2 different places from the top to the base of the tile wall or wall unit.
Measure the total depth from the front part of the enclosure area to the back wall along both sidewalls.
Compare the measurements – if they differ even slightly, use the largest of the two.
When measuring a corner shower, take your tape and measure it from the corner going outward along the two walls at the point where the base will be fixed
Step Two – Prepare a Budget
The purpose of creating a budget is to help you to avoid being led off your tracks.
Talk to your contractor and use their information to list down all the items you need. Also, factor in such costs as labor costs and transportation costs.
If you are completing a comprehensive bathroom renovation, it only makes sense you go for the best shower kit with a price within the margins of your budget.
According to Home Advisor, a new shower kit could cost you $4,185 on average with a range of $1,535 – $6,846.
The total amount you may spend on a shower kit can depend on a few factors including the size and style.
For example, a 32” square kit costs between $750 and $2,500 while a custom design costs between $1,200 and $6,350.
You are likely to pay more if you are doing a replacement or looking for luxury features or full-body showerheads. But’s just the cost of the shower kit.
Understand that every minor detail of every item in the shower kit can have a profound effect on the overall cost of the whole unit.
For example, the cost of the shower enclosure alone can be affected by these attributes:
1. Glass thickness
Standard glass thickness in shower enclosures range between 4mm to 10 mm (although there are no 7mm and 9mm options). The price increases with thickness – the thicker the glass, the more durable the enclosure is.
2. Enclosure size
A big enclosure will require more materials to set up
3. Enclosure style
The enclosure shouldn’t cause you to adjust your budget
4. Enclosure brand
Famous and well-established brands tend to overprice their products
5. Accessorize
Incorporating more accessories to your enclosure means yo8u are spending more money
Step Three – Choose the Right Size of Your Enclosure
What size of the enclosure do you want?
This is one of those moments you need to evaluate your needs and the advice of your contractor.
There are enclosures as small as 32-inch x 32-inch, most homeowners would feel comfortable in enclosures measuring 48-inch x 36-inch.
If you have plenty of space in your bathroom, it would be great if you went for an enclosure measuring 60-inch x 36-inch.
Step Four – Decide on The Shape
The reason why you need to decide wisely when it comes to the shape of the enclosure is it affects your comfort, practically, and can have a bigger say on styling.
This is the step you need to remember that the design of your bathroom is your idea – there’s no wrong or right choice.
Your size choices will be limited to five commonly used shapes:
1. Quadrant enclosures
This type of showers looks very much like a pizza.
If you are looking forward to saving some space in your manufactured home’s bathroom, this can be a preferable shape.
DreamLine offers a collection of some of the best Quadrant enclosures in the market, including the DreamLine Prime Chrome Acrylic Wall Floor Round 3-Piece Corner Shower Kit (Actual Size: 76.75-in x 36-in x 36-in).
2. Offset quadrant enclosures
This type of enclosures fits neatly in the corner just as a quadrant would, but it’s longer compared to the standard quadrant enclosures. If you have plenty of space in your bathroom, you would consider this enclosure.
3. Rectangular enclosures
These enclosures come in the shape of a rectangle and can be used in spaces where the standard bath would fit.
4. Square enclosure
They are square-shaped and are both practical and stylish for any type of bathroom
5. D-shaped enclosures
These shower enclosures are similar in appearance to the guardant type except that its flat backside permits it to lie back on any straight wall while still providing space and style that comes with the curved design.
Step Five – Decide on Styling
In shower enclosures, style is everything. Virtually all the shower enclosures you will find in the store comes in one of these four styles:
1. Frameless shower
This shower comes with no visible style.
They come in all sizes and shapes and have somewhat become expensive and luxurious nowadays probably because the other three styles have become too commonplace.
DreamLine’s Mirage family has plenty of frameless doors, including the DreamLine Mirage-X 72-in H x 56-in to 60-in W Frameless Bypass/Sliding Brushed Nickel Shower Door (Clear Glass) which also happens to come with both stationary and sliding door varieties.
2. 3-sided shower
These 3-sided showers use the wall as their fourth side.
They are perfect for the middle of the wall installation.
They also allow you to install the shower far away from the away. Check out DreamLine French Corner Satin Black Floor Square Shower Enclosure.
3. Walk-in shower
Also known as wet rooms, they are the most practical enclosures for getting in and exiting.
They come doorless, making it easy to enter and exit.
They also make your bathroom look spacious.
Because they don’t take a lot of space, they are great for small bathrooms often found in manufactured homes.
4. Corner entry showers
These showers let you mix practicality with style.
They can be the best option for homeowners who would like a rectangular or square shower enclosure in not-so-big bathrooms that restricts you to only enter the enclosure from the sides.
Ove Decors offers a few cool corner showers, including the Breeze Chrome Acrylic Wall Floor Round 4-Piece Corner Shower Kit (Actual: 76-in x 31-in x 31-in) which also comes with adjustable wall jambs ideal for out-of-plumb walls.
Step Six – Choose the Shower Door for The Enclosure
Different types of showers with different styles go well with specific styles of doors – yes, that’s how complicated it is.
Still, it all boils down to your needs. As we mentioned earlier, there is no right or wrong style, just choose what meets your needs.
It is also reassuring to know that your choices will be limited to just three styles of doors.
1. Sliding shower doors
These doors are great for quadrant but can still be used on any enclosure designed to save space.
2. Hinged shower door
These doors work like traditional doors – they swing outward. They are ideal for confined shower enclosures. They are often used on rectangular and square-shaped showers.
3. Bi-Fold doors
The doors come with a join in the middle which allows them to fold in on themselves. This feature makes them ideal for space-saving applications, especially in small bathrooms.
Conclusion
Choosing the best shower kit for your bathroom kit can be a daunting task, there are a lot of decisions to be made.
However, if you understand your needs and seek the advice of your contractor, the process of choosing the right shower kit becomes a bit easier.
You will also need to set your budget and focus on the attributes that make the shower kit good for your needs.
