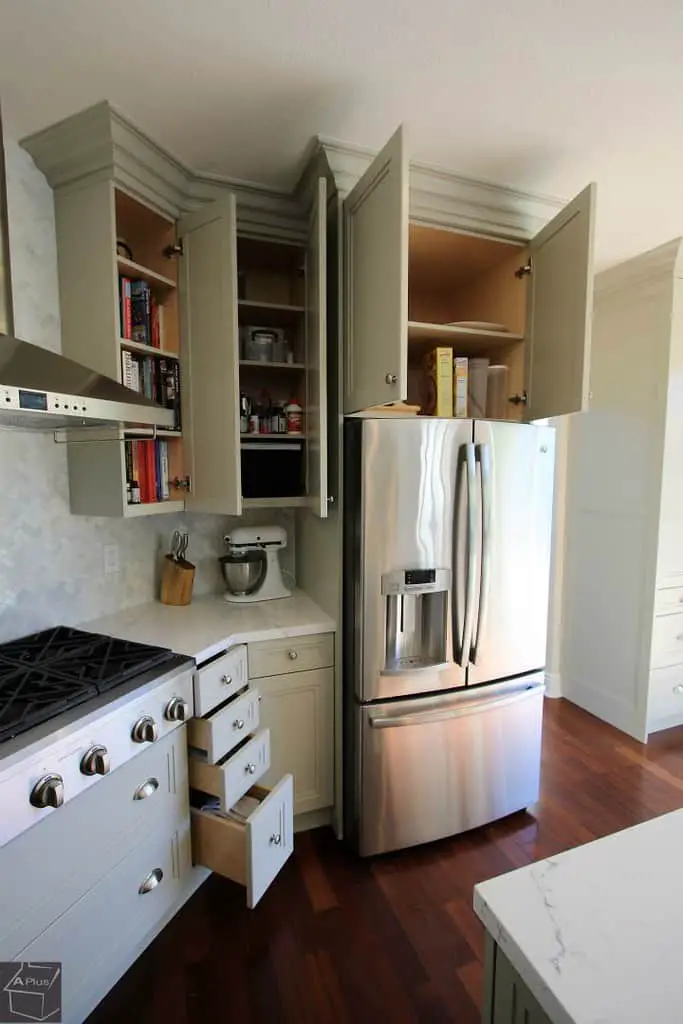
Manufactured homes look and feel like traditional homes that were based on foundations. They come with a myriad of options and features to meet your favorite style.
Fortunately, kitchen cabinets come in all sizes and configurations to suit your kitchen space.
You will find a lineup of high-end cabinets designed from a wide range of hardwood, including
- walnut
- oak
- and cherry.
Besides the guaranteed durability, most manufactured home kitchen cabinets allow you to remodel them with the necessary hardware.
With manufactured home kitchen cabinets, homeowners have an option to choose from many attractive cabinets. The many options allow you to pick the right style that brightens your kitchen. However, because of the frequented use of kitchen cabinets, you will want to remodel them to suit your taste.
When it comes to customizing your kitchen cabinets, the options are endless.
The primary components of kitchen cabinets include
- face frames
- doors
- hinges
- knobs,
- pulls
- and drawers.
In addition to these parts, there are other components you can add to personalize your cabinets and make them attractive.
Are you planning to remodel your manufactured home kitchen?
Or, do you just want to customize your kitchen cabinets?
In this guide, you will find in-depth information about kitchen cabinet parts and how you can customize your cabinets.
The Nine Basic Manufactured Home Kitchen Cabinet Parts
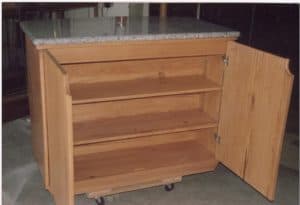
A basic manufactured home kitchen cabinet will generalize your kitchen needs and won’t have dedicated spots.
It usually includes the carcass with shelves, doors, and maybe a few drawers.
Therefore, you won’t expect much with these cabinets because the designers made them without the real picture of your kitchen.
Nevertheless, they are better than none and will still help keep your kitchen organized.
Manufactured door cabinets are assembled differently, which makes them significantly different.
The material used to construct your kitchen cabinets will eventually determine its quality.
For this reason, it is ideal to have your kitchen cabinets customized to suit your needs better.
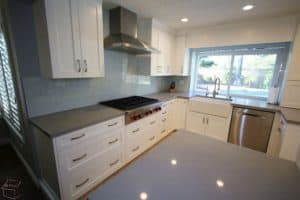
Ideally, personalized kitchen cabinets create an ultimate modern feel and ambiance besides adding convenience to your kitchen.
Materials used to make cabinet parts determine its value, and the furnishing defines your manufactured home kitchen cabinets’ beauty.
Here is a description of some of the essential elements of a cabinet.
1. Cabinet carcass
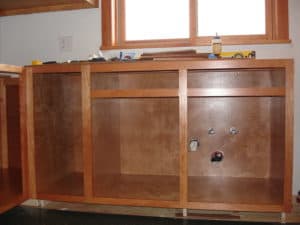
Basically, this is the entire cabinet box.
Carcass provides the siding of the cabinet, and its space is the one that is partitioned to accommodate different sections.
The cabinet carcass depth will vary depending on whether you are constructing a base cabinet or wall cabinet.
2. Cabinet Face Frames
Like any other framing, cabinet face frames are the part that provides stability and ensures squareness of the cabinet front.
Cabinet face frames are typically narrow strips of hardwood framing the cabinet carcass opening.
Besides keeping the box square during shipping and installation, face frames provide a rigid mounting point for hinges.
Cabinet face frames offer unprecedented design flexibility since they allow cabinets to be customized to suit personal specifications.
3. Cabinet doors
Another basic but extremely important part of the kitchen cabinet is the door.

Choosing the style and color of your cabinet doors plays an indispensable role in coordinating your kitchen design.
Cabinet doors can be made of solid woods or engineered wood.
The panels of cabinet doors are styled decoratively and painted to offer a smooth, lustrous finish that blends with kitchen interior design.
Doors are the exposed part of your kitchen cabinets; therefore, they should be customized to sync with the kitchen interior.
4. Hinges


Although cabinet door hinges are concealed, they are an essential part of the manufactured home kitchen cabinet.
Their role is simple yet necessary because you can’t construct a cabinet without them.
Hinges connect the cabinet face frames, and the door work to allow the cabinet door to open and close.
Basically, hinges work by rotating, ultimately allowing the cabinet doors to swing while in place when opening or closing.
Because their quality differs significantly, it is ideal to pick high-quality hinges as the door will be opened thousands of times.
Cabinets featuring concealed are ideal for aesthetics.
5. Drawer fronts


Also known as the drawer face, this is the front piece attached to the drawer box.
It is also the part onto which the drawer pulls or handles are secured.
Like cabinet doors, drawer fronts need to be styled and painted to match and coordinate with the kitchen interior.
6. Drawer slides


These are hardware pieces mounted beneath the drawer box.
They allow the drawer to slide with ease when opening or closing it. Although some people prefer mounting them on the drawer’s sides, drawer slides are best when installed below the drawer.
Undermount drawer glides can hold considerably more weight and offer ultimate support.
7. Drawer box
This is the box of the drawer.
Drawer boxes may or not include the drawer front.
Standard kitchen cabinet drawer boxes should be constructed with solid hardwood sides.
The generally accepted thickness of wood is ½ inch.
The bottom should be strong to hold the contents. The best drawer boxes will have their bottom made from ⅜-inch thick plywood. It can withstand more weight.
Some drawer boxes are constructed from plastic and metal, but they are not as durable as their wooden counterparts.
When buying, you need to consider the drawer box material and joints. The standard quality of cabinetry calls for wooden drawer boxes with dovetail joints.
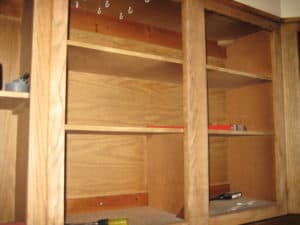
8. Cabinet shelves
Cabinet shelves are flat panels that divide your cabinet into multiple cavities, and they also help organize your kitchen cabinets.
Kitchen cabinetry shelves are usually made of plywood and furniture boards. Because they’ll bear a significant amount of weight, the primary consideration is always its strength.
An ideal cabinet shelving will be ¾ inches thick, but ½-inch will also work.
Shelving can either be full-depth or half-depth.
Kitchen cabinet shelves should be well secured to the cabinet walling and need to be lined before you start organizing. This will protect them from moisture and stains so that they last for years.
9. Interior finishing material
The interior of your kitchen cabinets, drawers, and shelving should be non-porous.
Kitchen cabinets with melamine or laminates finish are easy to clean and also tend to stay for longer.
Ideally, the interior finish material of your kitchen cabinets should be easy to wipe clean.
The standard finishing material features a light wood-tone color; therefore, making it easy to see the contents.
If you cherish uniformity and aesthetics, you can use an interior finish material that coordinates with your wall and install a glass door.
Related: Should You Put Cabinet Hardware On Fake Kitchen Drawers?
How To Build Your Own Custom Kitchen Cabinet In Ten Steps
Are you planning to remodel your manufactured home?
The first thing you will want is having cabinets that suit all your needs and blend with your taste.
Customized cabinets are a good way to coordinate the style and organize your kitchen.
Building your own Do-It-Yourself kitchen cabinet can seem to be a daunting project.
The truth is that the primary cabinet-making operations are cutting, assembling, and finishing.
Regardless of your proficiency level, you can achieve the art of building your customized kitchen cabinet.
Creating your kitchen cabinet is an easy project, especially if you are a savvy DIYer, and here is how you do it.
Tools
- Table saw with a sharp blade
- A band saw/circular saw
- Drill
- Clamps
- Tape measure/ruler
- Bevel
- Belt sander
- Jig Saw
- Pencil
Step 1: Plan and sketch out the cabinet
This is the roadmap to your project. You will need to measure the available wall space and sketch out the kitchen cabinet.
Reliable measurements and an ideal sketch will help you visualize if your plans are converging. In this step, you will also want to decide on the cabinet style (face-frame or frameless), door style, and types of hardware needed.
Step 2: Cutting plywood down to size
Carefully measure and cut the plywood to fit the width of your intended cabinets.
If you are making both base and wall kitchen cabinets, make sure to identify the pieces separately.
This is handy if you are building cabinets with varying widths.
The height of wall kitchen cabinets might also influence how you rip down plywood to size.
Step 3: Cut cabinet carcass pieces
When designing the cabinets carcass, especially for base kitchen cabinets, keep in mind that they support a countertop.
You will want to make your cabinets to a comfortable height. For base cabinets, it is good to make your cabinet side panel not more than 35 inches long.
Your wall cabinets’ side panels will depend on whether you want the cabinets to touch the ceiling and how high you want them above the countertop.
Basically, wall cabinets should be at least 18 inches far off the countertop.
The higher you keep them from the countertop, the better. However, the bottom and top panel pieces should be equal to those of base cabinets.
Step 4: Cut out Toe Kicks on base cabinets

However, you can build the base cabinets without toe kicks.
Cutting about 3.5-by-4.5 inches will provide enough space to save your toes if you are pretty careless.
Step 5: Apply edge banding.
Frameless cabinets are gaining popularity and are considered modest.
You will also want to sail with the fast-paced world – stay modern.
Because you are building frameless cabinets, it is good to apply edge banding to cover the plywood edges.
Edge banding is only used on the front side of each panel piece.
Step 6: Assembling your cabinet carcass
It is now time to assemble the box part of your cabinets.
- Most people prefer using glue to the carcass together.
- For ultimate support, you can drill reasonable pocket holes and attach the pieces using pocket hole screws.
- Assembling the carcass for base and wall kitchen cabinets is relatively simple.
- Add the back to your kitchen cabinets to make the boat part complete.
- When cutting the backs, make sure to do it accurately-ensure the squareness to seal the back properly.
- Secure the backing or just nail it to the assembled panels.
Step 7: Adding doors, drawers, and shelves
There are different types of cabinet doors that you can install in your manufactured home kitchen cabinets.
Because you are building frameless, the best style is a full overlay.
Basically, this style is where the cabinet door or drawer entirely covers the front part of your cabinet opening.
With a full overlay, there is no other part of your kitchen cabinet that is visible. It is advisable to install cabinet doors after installing the cabinet itself.
In this step, you also need to build drawers.
- Determine the height of drawer fronts. You will need to use full overlay drawers because your kitchen cabinet is frameless.
- Mount drawer slides (drawer glides). The height of the drawer fronts will help you determine where to mount the drawer slides. Drawer slides come in different types. Fortunately, you don’t need spacer blocks for frameless kitchen cabinets.
- Build the drawer boxes. Construct drawer boxes with ideal length and height. Ideally, the width of your drawer boxes should be an inch less than the opening width. Cut the side pieces and the bottom part and nail them together.
- Install the drawer boxes into slides and attach the drawer fronts.
- Depending on your kitchen need, you will also need to install shelves. Cut sizable boards and nail them or install them using pocket holes and screws.
Step 8: Sanding and finishing
- The right finish is what makes your cabinets appealing.
- Use an electric sander for sanding the cabinet and doors.
- After sanding, stain the cabinet to match your kitchen style or the surrounding cabinetry, if any.
- Allow the finishes to dry completely.
Step 9: Installing the cabinet
In this step, you will need the help of someone to lift the wall cabinets.
- Locate and make the studs’ positions and mark corresponding points inside the cabinet.
- Secure the kitchen cabinets to the manufactured home wall studs using screws.
Step 10: Attach the cabinet door.
After attaching the cabinets to the wall studs, attach the door with hinges and screws.
You can now stand and smile at your well-done work.
Related: What Are the Pros and Cons of Using a Credit Card for Home Improvements?
The Three Manufactured Home Kitchen Cabinet Accessories That You’ll Need
1. Knobs and pulls
Knobs and pulls allow you to open your cabinet door with ease.

Pulls are considered something of modernity and are found in most of the newest kitchen cabinets.
Pulls are an ideal choice for drawers that carry considerable weight, while knobs are perfect for lightweight drawers and cabinets doors. When shopping for knobs and pulls, quality is a crucial consideration.
Here are the installation steps
- Measure for doorknobs or pulls. Whether to position them at the bottom or top of the door depends on your taste. For drawers, the handles should be set at the center of drawer frons.
- Mark pull locations on the door. You will need to identify the position and mark it with a nail. You will measure vertically for cabinet doors, while for drawers, you will measure horizontally to mark holes for screws.
- While holding the door open, drill through the front of the door at marks.
- Using the screw provided by the manufacturer, secure the pull to the door.
If you are only replacing a damaged door pull, the trick is to buy the right size then secure it into the holes. Make sure to use a screwdriver to tighten the screws.
2. Hinges


Replacing hinges is not one of the hardest things. All you need to do is remove the door, remove the broken hinge, screw a new hinge, and re-attach the door.
- Using a screwdriver, unscrew to remove the door completely. Also, unscrew the faulty hardware to remove the broken hinges and its components.
- Screw the new hinge into place using ideal screws. You may be required to drill new holes.
- Slide the hinge receiver to attach it to the hinges.
- Attach the cabinet doors.
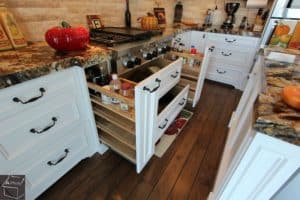
3. Cabinet organizers
Cabinet organizers come in different sizes, designs, and shapes to suit different kitchen demands.

Depending on how you want to organize your shelves and drawers, you will buy kitchen cabinet organizers to suit your needs.
Some cabinet organizers you may consider buying include lazy susans, slide wire baskets, mug tree, kitchenware dividers, etc.
Conclusion
Keeping your manufactured home kitchen organized doesn’t have to be intimidating.
All you need is to have a decent kitchen cabinet and buy different organizers to hold various kitchenware.
One of the amazing things with manufactured home kitchen cabinets is that they are cheaper to construct.
Make sure to use quality hardware and accessories to have your cabinets last for years.