
Kitchen cabinets are some of the most important installations in your new home.
You don’t want to imagine how a kitchen will look without cabinets.
Besides serving as lockers for valuable items and foodstuff in the kitchen, they are used as working platforms.
Therefore, they become additional countertops and generally create a wonderful impression in the kitchen.
Now, you have installed them in place.
You want to proceed to the next step of fixing tiles.
Your kitchen should have an ultra-modern look. Tiling it is the number one step to achieve that noble goal.
So, Should You Tile Under And Around The Kitchen Cabinets?
Yes.it is very possible to tile under and around the kitchen cabinets. And we are going to tell you how to do it in this article. We will also give you insights on what you need to perform a job well done. It is normal to be curious and indecisive when handling a new project. You are wondering whether you are going to achieve the results you so much desire or something else. And that is why this article is pieced together for you. We want to help you answer all your questions regarding tile fixing in the kitchen room and especially how to do it with cabinets in place. Keep reading.
Should You Install Tile BEFORE Installing Kitchen Cabinets?
Yes. It makes work easier for the tile installer since there will be no sealant applications and finish cuts.
Installing tile with cabinets in place requires you to finish the sides of the cabinets.
It is a technical procedure that includes delicate and precise cuts. It equally consumes time.
The case may prove different, however, if you need to waterproof the installation.
If the cabinets must be fastened to the floor, mount the cabinets in place.
For more effective results, your waterproofing should cover the whole floor area around the kitchen cabinets.
Your kitchen is one of the wettest rooms in your new home and waterproofing is almost a prerequisite to ensure a longer lifespan for your cabinets and countertops.
Water and moisture may find a way between the tiles and the cabinets and cause molds developments.
Besides, an odd smell builds up in there and makes the entire room so smelly.
Two Benefits of Installing Tile Before Cabinets
- You will require additional square footage with less trim work
- The new tile creates a platform and workbench for other tasks to be carried out in the kitchen area
Should You Install Tile AFTER Installing Kitchen Cabinets?
It is equally possible to install tile after the cabinets and those other basic installations in the kitchen like stone countertops.
Since such kitchen floors are designed to withstand pressure, downward pressure during installation is minimized.
But you should note that tile requires specialized cutting and sealing of the edges between them and the kitchen cabinetry.
Perimeter joints must be made between the tiles and the cabinetry.
Three Benefits of Installing Tile After Cabinet
- Less square footage is required
- Reduced risks of damage to the floor when doing other finishing tasks
- It makes it easier to change the floorings later without necessary removing the cabinets.
You also need to do thorough clearance when installing tiles after cabinetry.
Built-in appliances such as compactors and dishwashers should be cleared from the space.
It may, however, become difficult to remove these appliances from their place if the floor assembly is higher than their adjustable legs.
Tiling Under the Kitchen Cabinets
If you are doing this for the very first time you need to be aware of these crucial steps.
It is equally important if you are going through the tips so you can know exactly what your installers want in the course of the journey.
Let’s do this
1. Properly Mix the Thinset
You need to first, mix about two gallons of thinset.
These are primarily meant to cover the floor so that you can put the boards in place.
Have you ever seen creamy peanut butter? That is exactly how the consistency of the mix should look like.
2. Important Safety Alerts When Fixing Tile
Always wear eye protection. Power tools can be a grave danger to your eyes
Put on your face mask when working with dry thinset. It saves you from inhaling these bags of dust particles and chemicals
If you are removing old floorings, test them for asbestos.
Asbestos can be a health hazard if it escapes the environment.
You may need professional asbestos removal here. Should asbestos be suspected, a backer board is used to cover the floor, followed by a thinset mix and then a tile to keep them at bay. Your family’s health is paramount.
3. Precise Application of Thinset On Linoleum
This is usually done using a trowel. Use it to smooth the thinset over the kitchen floor. Your trowel should be held at a 45-degree angle to the floor. Do this on the entire area of the project.
4. Backer Board Installation
Once you have covered the entire section of the kitchen floor with thinset, proceed to set the backer board over it.
Any adjustments that need to be made should be handled when the thinset is still wet.
Now begin to screw the backboard firm in place following the grids on it.
5. Fix the Tiles on the Floor
The first procedure here is to plot out an ideal pattern for the tiles.
A spacer is a recommended guide for this job. It should guide you to lay rows of tiles precisely in position.
You want to make your kitchen look very appealing and even the finest of things matter at this particular point. So, leave no stone unturned.
Additionally, laying out the tile pattern gives you a clear clue on the number of tiles you need for the job.
Perhaps we forgot to mention that you need to choose a very cool color for your tiles.
Install the tiles carefully to make sure that any adjustments are made before it is too late.
Honestly, this is usually a delicate procedure that demands a lot of attention. Clean them after it dries and finish the job with grout.
Additionally, you need to mix only the approximate thin-set since they easily dry out if left for long.
It may lead to wastage.
You should acquire enough tiles for the project before you commence it to avoid inconsistencies and enhance the uniformity of the project.
Set the tiles on the floor to ensure that every area is covered.
6. Preparing Your Kitchen Floor for Tiling
What You Need
- Safety glasses
- Knee pads
- Crack-prevention membrane
- Saw
- Tape measure
- Backerboard screws
- Cement board
- Chalk line
- Carpenter’s square
- Floor Prep Steps for Tiling
Preparing your kitchen floor for tiling is, undeniably, a delicate and difficult procedure.
This is especially true if you have other things and appliances in place.
You might be finding it very difficult to remove that countertop, the cabinets, and so on.
Maybe before you get discouraged, you need to look at the results.
You want to create one of the coolest environments in your home. And your kitchen is one such room.
Let’s get down to floor preparation tips.
Set the subfloor in order. This is a requisite undertaking. First things first! Be it a wooden or a concrete subfloor, they need to be properly set before you begin.
Figure out the starting point and determine an ideal lay pattern. There are many patterns from which to choose. It helps you in planning for cabinets fixtures and pattern.
Related: Is Under Cabinet Lighting Worth It?
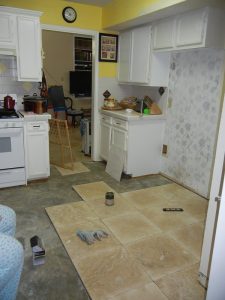
Can You Tile Around the Kitchen Cabinets Without Removing Them?
Yes. It is possible to replace kitchen tile without having to remove the cabinets.
You know how hectic it can be to remove kitchen cabinets.
Getting them back there is not a walk in the park. It is time-consuming.
Even if the cabinets are built on top of the old tiles.
All you have to do is to trim the tiles around the cabinets.
Remember to use appropriate tools for the job to ensure precision.
We are assuming that you have cleared the area as highlighted earlier.
This helps you to avoid obstacles and even injuries.
You then need to proceed to cover any vents.
Use a pry bar to clear any moldings on the walls and floors.
A masking tape will protect the edges of the cabinets from damage.
A rotary power tool helps you to cut the tiles on the walls around the kitchen cabinets.
Once removed, you can do replacements of tiles around the cabinet in the same pattern.
You will be required to trim the new tiles following the pattern of the gab.
Final Words
Tiling around and under the cabinets is possible.
Tiling your kitchen not only creates an outstanding appeal but also safeguards your floors from damage due to pressure and penetration of moisture between the walls, floors, and cabinets.
It is a great way to protect your cabinets from potential molds and mildew destruction.
Either of these ways is possible but you need prior preparations and ideal human resources to do a job well done.
Acquire all the necessary materials and go for highly skilled human labor. Unless you are an expert yourself.