
The first thing on your list while shopping for a mailbox should be a question – what do you want the mailbox to fulfill?
Whether you intend it for collecting mail for a single person or serve as a hidden newspaper door, you want it to do the job perfectly.
There is a wide range of options in the market that you can choose from. One of the best ways of starting your journey is listing down your needs.
Thereafter, it will be much easier to select a product with features that meet your needs.
Here are a few things to bear in mind:
- How many individuals will be receiving their mail through your mailbox?
- Will you attach your mailbox on the wall of your home or on a post at the edge of the driveway?
- Do you need a multi-family mailbox?
- How is the weather like in your area? How will it affect your mailbox?
- How much mail are you anticipating?
6 Manufactured Home Mailboxes Shopping Factors
1. Material of Construction
The materials of construction can determine the rigidity and weather resistance of the mailbox.
Most of the products you will find in the store are made from 4 types of materials:
- steel
- aluminum
- brass
- plastic
Steel
Steel is known for its durability and excellent resistance to rust.
Mailboxes made from steel are rigid and hard to break.
However, the fact that a mailbox is made from steel alone is not enough to protect it from insults of weather.
For this reason, you will need to go for one with some extra protection on the surface or add a layer of protection yourself.
Two brands to check out for quality steel mailboxes are
Aluminum
The best thing about aluminum mailboxes is they are resistant to most environmental elements.
Aluminum boxes also provide the perfect security you need for your mail and parcels. Unfortunately, pure aluminum bends easily and your mailbox may be prone to denting.
This should prompt you to opt for boxes made from cast aluminum. Still, aluminum mailboxes need to be treated with extra water resistance properties.
Another advantage of aluminum is that it is lightweights.
Two brands to check out for quality steel mailboxes are
Brass
Brass mailboxes come in a more formal look. They also tend to be rigid and durable like those made from steel.
The main drawback of brass boxes is that they require constant shining and polishing to prevent the development of patina – a greenish buildup caused by exposure of brass to moisture and air.
Two brands to check out for brass mailboxes
Plastic
Plastic adds character a metal can’t.
Mailboxes made from plastic also tend to be remarkably durable and can’t withstand heavy rains and high humidity because they never rust.
However, if you live in an area prone to extreme heat, plastic won’t be the best material for you.
There are a few outstanding brands with excellent plastic mailboxes, including 4Ever Products.
2. Basic Mailbox Features
There are those features every mailbox must have or at least should have.
There are four –
- locking mechanisms
- reach access
- newspaper holder
- personalized features.
There are brands that specialize in making boxes that offer the best of one or a few of these features.
Locking
To ensure that no one else can access your information, you need to buy a mailbox equipped with a lock system.
While USPS offers a free subscription service that sends notifications (by email) to homeowners about incoming mails, you can’t be sure you will get the alert and stick around to wait for the parcel.
PEMCO advises homeowners to install a locking mailbox so that they don’t have to watch for such notifications. But remember there is no mailbox out there that is entirely foolproof.
You will need to take additional steps to ensure maximum security for your information and mail from being stolen. Still, you need one with a locking mechanism.
Rear Access
Boxes with a side or rear access door permit you to retrieve your mail safely and away from high traffic areas. Mailboxes with one of these two doors are appropriate for busy neighborhoods or rural areas.
Newspaper Holder
One of the top regrets reported by many homeowners is buying a mailbox without figuring out how it will separate the mail from newspapers.
If you don’t consider this feature for shopping for a box, you are likely going to have to contend with mixing your mail and newspaper in an ugly pile.
A mailbox worth a separate newspaper holder ensures that the unit doesn’t overflow with envelopes and newspapers by incorporating a separate slot for the latter.
Personalized features
Many homeowners prefer having their names on their boxes just so they don’t get someone’s else’s newspapers or mail.
Also, having a name on your mailbox can be a great way of personalizing a piece of otherwise mundane equipment.
3. Design
There is a wide range of mailbox designs very different from the traditional box standing close.
Some designs come with an esthetical value while others are aimed at easing the mail retrieval process among other interactions you may have with your box.
Most of the mailboxes you will find in the store fall in one of the six common designs –
- wall mounted
- post mounted
- column-mounted
- mail slots
- multi-family
- mail vaults.
Wall-mounted
As the name suggests, these boxes are attached to your home’s outside wall. They are common in urban settings in areas where homes are packed close together and the mail carrier distributes mail on foot.
The main benefit of this design is easy content retrieval. Also, you don’t need to make efforts to protect it from the elements of weather as it will be protected with your home’s overhang or awning.
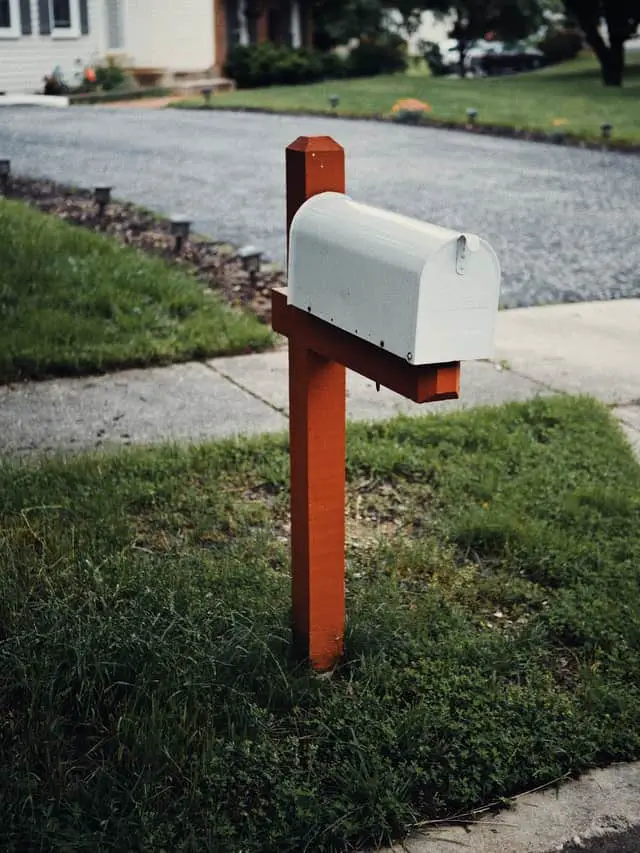
Post-mounted
Mailboxes that comes in this design are freestanding and tend to sit along a curb or on the edge of the driveaway.
They are commonplace in rural neighborhoods that require the mail carrier to distribute mail by vehicle, but the person may not need to get out of the vehicle.
The main advantage of this design is that it adds character to the home’s entryway. Also, these mailboxes tend to come in a range of colors, styles, and materials that can rhyme with virtually any outdoor style.
Column-mounted
This style of mailbox is attached to its own specially built column (very often) or one of the columns supporting your home on to the front (rarely).
Mailboxes with this design make a remarkable style statement and tend to last longer than freestanding and most other designs.
They also stand a higher chance of surviving those winter plow damages. Plus, they are more permanent and formal.
Mail slots
This is the most recommendable design if you want to simplify the way you receive your mail. Although the popularity of mail slots is in a sad decline, they still offer a traditional and more old school charm.
When installing this type of mailbox, remember to check with the local USPS office to ensure the mail carrier can leave the vehicle or is on foot.
Nevertheless, their seamless traditional design is attractive and distinguishes them from most of the modern designs.
Multi-family
This design of the mailbox comes in a range of styles and shapes. It is popular in apartments but can be installed by a family living in any home as long as there is a need for discrimination of different mails meant for different family members.
The recessed variety is the most popular and can be installed on a wall. They bring the benefit of serving several people and go a long way to add character to your home’s entryway.
Most multi-family boxes feature several inbuilt directories matching the number of the home’s occupants who need to use it.
Another multi-family box design consists of several post-mounted mailboxes.
Mail vaults
This design is appropriate for any homeowner who is never around most of the time and prefers collecting mail once in a period. Mail vaults give you the peace of mind you need – you don’t need to worry about a missed parcel or a stolen item.
The most plausible thing is that everything that is dropped in the mail vault can’t be accessed by anyone else except you.
Better yet, some of them come with a vacation stopper to prevent packages from accumulating when you are away for a long period.
4. Number of Compartments & Size
How much mail or parcels are you anticipating?
You might want a mailbox with several compartments or one that is large enough to meet your spacing needs. Understand your capacity needs before choosing the mailbox.
Most of the options you will find in the store comes with between 1 and 30 compartments. There are options with more than 30 compartments.
Alternatively, you can choose between one of the four popular sizes of mailboxes –
- small
- medium
- large,
- extra-large.
5. Dimensions – Height, Depth, & Width
The dimensions of the box will determine its capacity.
Again, start by evaluating your capacity needs before deciding the dimensions.
Most of the products you will find in the store don’t go past 94” height, 937” depth, or 78” width.
A product measuring approximately 23 1/2” long by 11 1/2” wide by 13” inches high is appropriate for an average manufactured home.
6. Cost v/s Budget
A typical residential mailbox costs between $12 and $900.
They can be purchased at any hardware and house improvements stores like
- Lowe’s
- Home Depot
- Ace Hardware,
- Sears.
The cost can depend on the material of construction, additional features, type and quality, and accessories you choose to add on them such as a peel & stick house number, name, and other letters.
Some mailboxes are sold as kits and may come with supplies like steel posts.
The cost of the post is normally included on the kit and, with careful calculations, you will find yourself spending an additional $14 – $300 depending on the material of construction and weight.
Fortunately, there are no permits, inspection, and installation costs (except if you must hire a person to install it for you) you need to cater for, so you will spend $0 on that. However, remember to check what HOA restrictions say if they exist at all.
It is recommended that you prepare a budget that adequately covers the cost of the mailbox of your liking as well as the cost of hiring a qualified professional to install it (if you will need a professional at all).
There is always a maximum amount of money you will be willing to spend on a unit and the installation process. If you have $50 in your hands, for example, your budget might not permit you to spend on the best multi-featured mailbox you could find.
Basically, a budget prevents you from overspending or potentially opting for boxes you didn’t consider at the beginning.
INSTALLING YOUR MAILBOX – A DIY GUIDE
The skills required to install a mailbox are simple to acquire that every homeowner should have. It is advisable that you choose from the standard-mounted boxes that line neatly with your sidewalk and increase the curb appeal of your home.
You can also opt for a wall-mounted option that can be easily installed on a fence close to your door at the eye level.
The USPS (United States Postal Service) has specific requirements the homeowner must follow when installing any type of mailbox on their property.
They are incorporated later in the guide. Alternatively, you can find them in detail on USPS’s website.
Also, while this guide is designed to provide all the guidance you need for typical mailbox and post-installation, there are several types of box models.
For this reason, consider checking the instructions that were shipped with your box for more specific guidance.
INSTALLING A POST-MOUNTED BOX
- Tools
- Tape Measure
- Power Drills
- Shovels
- Twist Drill Bits
- Post Hole Digger
- Standard Level
- Screwdriver Sets
- Materials
- House Letters & Numbers
- Ready Mix Concrete
- Pens, Pencils & Markers
- Mailbox Posts & Stands
- Wall Mount Mailboxes
- Post Mount Mailboxes
Step 1 – Dig Post Hole
USPS requires that the post should not exceed 45” above steel level.
Since most streets nowadays feature a curb, you can take the standard box height to be 42” above ground level. Therefore, the total height can be around 45” – that’s 42” from the ground, and a few more inches added by your curb.
- Measure the post’s height. USPS requires that this height must be between 41 – 45” over the road’s surface. The standard height of the box over the ground is 42”
- Mark a point on the lawn between 6 – 8” back from the curb. In case your curb is not raised, consider contacting your postmaster for appropriate guidance
- Now use your post digger to create a hole in the ground in which your post will stand. Dig it in such a way that the 42” of the post will remain outside.
Step 2 – Insert The Mailbox Post
Ensure that your mailbox meets the recommendations of the Federal Highway administration: a stable yet non-rigid post that can fall to the side or bend if hit hard enough by a moving car.
Also, avoid unyielding support structures such as concrete or metal posts.
Instead, opt for a 4 x 4” wooden structure or a 2” diameter standard aluminum or steel pipe.
- Erect your mailbox post in the hole
- Take a few support beams and prop the post with them around it
- Measure the post’s height and ensure part of it is 42” above the ground
- Take a level and ensure the post is straight up
- If the manufacturer supplied the kit with instructions, take them out and peruse through to double-check and see how you need to proceed
Step 3 – Pour The Concrete
- Proceed to prepare the manufacture’s recommended bay of concrete and pour the mix into the hole, spreading around the post
- Be careful not to fill the concrete mix flush with the surface of the ground – leave a few inches above the hole
- Immediately after pouring your mixture, double-check the post. If it has moved a bit, correct it before the concrete dries up.
- A 50 lb. bag is concrete is enough to complete the project
Step 4 – Allow The Concrete Mix to Set
- The exact settling and drying period depends on the kind of concrete – check the label of the concrete
- Leave the support structures holding the post in position until it sets and dries completely
Step 5 – Attach Your Mailbox According to The Manufacturer’s Instructions
- Take the mounting brackets and attach the mailbox on the post as directed by the manufacturer’s manual.
- Again, double-check the flatness of the mailbox using a level
- From here, proceed to add street numbers and other needed pieces of information